
Understanding Epoxy Basement Floors
Epoxy basement floors are more than just a trend—they're a durable, versatile solution for transforming often-overlooked spaces. Epoxy, a resin-based coating, is known for its incredible strength, making it ideal for basements that endure heavy foot traffic, storage, and occasional moisture issues. Unlike traditional flooring options, epoxy creates a seamless, non-porous surface that resists stains, cracks, and water damage, protecting your basement from the ground up.
What sets epoxy apart is its ability to fuse beauty with functionality. Available in a wide range of colors, finishes, and patterns, epoxy can be customized to match any aesthetic, whether you're looking for a sleek, modern look or a vibrant, creative space. Additionally, its reflective surface can brighten up a typically dark basement, making the area more inviting and usable.
Understanding the full potential of epoxy for basement floors involves recognizing not just its immediate benefits but its long-term value. With minimal maintenance, epoxy floors can last for years without losing their luster, offering a cost-effective way to upgrade your basement. Whether you're turning your basement into a functional living area, a home gym, or simply a better storage space, epoxy flooring is a robust, stylish choice that stands the test of time.
Best Epoxy for Basement Floor – Types

When selecting the best epoxy for your basement floor, understanding the different types available is crucial. The right choice of basement floor epoxy can dramatically enhance both the durability and appearance of your space.
Solid Epoxy Coatings:
This is the most robust option, offering a thick, seamless layer that adheres directly to the concrete. Solid epoxy is ideal for homeowners seeking maximum durability in their epoxy basement flooring, as it can withstand heavy use and resist moisture and stains. This type is often the go-to for those who want a long-lasting and resilient basement epoxy floor.
Metallic Epoxy Coatings:
For those looking to add a touch of luxury and creativity to their basement, metallic epoxy floor coating is a fantastic option. These coatings contain metallic pigments that create a stunning, three-dimensional effect, giving your basement floor an eye-catching, marbled appearance. It's perfect for turning a mundane basement into a visually striking space.
Decorative Flake Epoxy Coatings:
If you're interested in adding texture and slip resistance to your basement epoxy floor, decorative flake coatings are an excellent choice. These coatings incorporate small chips or flakes of different colors, creating a speckled look that can mask imperfections in the concrete while providing extra grip. This type of epoxy floor coating basement is both practical and aesthetically pleasing, making it a popular option for many homeowners.
Choosing the best epoxy for your basement depends on your specific needs, whether you prioritize durability, aesthetics, or safety. Each type of epoxy floor coating basement offers unique benefits, ensuring that your basement epoxy floor not only meets your functional requirements but also elevates the overall look of your space.
How to Epoxy a Basement Floor - A Step-by-Step Guide

Applying an epoxy floor coating to your basement can transform the space into a durable, attractive, and easy-to-clean area. Here’s a step-by-step guide to help you achieve a professional-looking basement epoxy floor.
1. Preparation: The Key to Success
Clear the Area: Start by removing all furniture, tools, and other items from the basement. You need a completely clear space to work on.
Inspect and Repair: Check the basement floor for cracks, chips, or damage. Use a concrete patch or filler to repair any imperfections, ensuring the surface is smooth.
Clean Thoroughly: Sweep and vacuum the floor to remove dirt, dust, and debris. Then, use a degreaser and scrub the floor to eliminate any oil or grease stains. Rinse thoroughly with water and let it dry completely.
Etch the Concrete: To help the epoxy adhere better, etch the concrete using a mild acid solution. Follow the manufacturer’s instructions carefully, then rinse and dry the floor.
2. Gathering Your Materials
Epoxy Kit: Purchase a high-quality basement floor epoxy kit, which typically includes the resin, hardener, and any decorative flakes or additives.
Tools: You’ll need a roller with an extension handle, paintbrushes, a mixing drill, painter’s tape, and protective gear (gloves, goggles, and a mask).
3. Mixing the Epoxy
Follow Instructions: Carefully read and follow the manufacturer’s instructions for mixing the epoxy. Typically, you’ll need to combine the resin and hardener in a specific ratio.
Mix Thoroughly: Use a mixing drill to blend the components until you achieve a uniform consistency. Ensure the mixture is free of lumps and bubbles.
4. Applying the Epoxy
Cut in the Edges: Start by using a paintbrush to apply the epoxy around the edges of the basement floor and along any walls or obstacles.
Roll on the Epoxy: Pour a small amount of epoxy onto the floor and spread it evenly using a roller. Work in sections, applying the epoxy in thin, even layers to avoid pooling.
Add Decorative Flakes (Optional): If your epoxy kit includes decorative flakes, sprinkle them over the wet epoxy for added texture and visual appeal.
5. Allow the Epoxy to Cure
Curing Time: Allow the epoxy to cure according to the manufacturer’s instructions. This typically takes 24-48 hours, but it may vary depending on the product and environmental conditions.
Apply a Second Coat (If Needed): For added durability, you can apply a second coat of epoxy after the first layer has cured.
6. Final Touches and Maintenance
Remove Tape: Carefully remove any painter’s tape from the edges before the epoxy fully hardens.
Inspect the Floor: Once the epoxy has cured, inspect the floor for any missed spots or imperfections. Touch up as needed.
Regular Maintenance: Keep your epoxy basement floor clean by sweeping regularly and mopping as needed with a mild cleaner.
By following these steps, you can achieve a beautiful, long-lasting epoxy floor coating in your basement. Whether you're looking to improve the space's durability or simply enhance its aesthetic appeal, a well-applied basement epoxy floor can make a significant difference.
Applying Epoxy to Your Basement Floor

Applying epoxy to your basement floor is a practical way to enhance both the durability and appearance of the space. With the right approach, you can achieve a professional-looking finish that transforms your basement into a more functional and attractive area.
1. Surface Preparation: The Essential First Step
Clear the Space: Begin by removing all items from the basement to ensure an unobstructed workspace.
Repair Imperfections: Inspect the concrete for any cracks, holes, or uneven areas. Use a concrete patch or filler to repair these issues, creating a smooth surface for the epoxy application.
Thorough Cleaning: Sweep and vacuum the floor to eliminate dust, dirt, and debris. Then, use a degreaser to remove any oil or grease stains. Rinse the floor thoroughly and allow it to dry completely.
Etch the Concrete: Etching the concrete helps the epoxy adhere better. Use a concrete etching solution according to the manufacturer’s instructions, then rinse and dry the floor.
2. Mixing the Epoxy: Precision Matters
Follow Instructions: Carefully read the instructions provided with your epoxy kit. Mixing the resin and hardener in the correct ratio is crucial for achieving the desired results.
Mix Thoroughly: Combine the components using a drill with a mixing attachment. Stir until the mixture is smooth and consistent, ensuring no lumps or bubbles remain.
3. Applying the Epoxy: Technique for a Flawless Finish
Cut in the Edges: Start by using a paintbrush to apply epoxy around the perimeter of the floor, including corners and along the walls.
Roll the Epoxy: Pour the epoxy onto the floor in small sections. Use a roller to spread the epoxy evenly, working systematically across the entire surface. Apply the epoxy in thin, even layers to prevent puddles and ensure a smooth finish.
Add Decorative Flakes (Optional): If you want to enhance the visual appeal of your basement floor, sprinkle decorative flakes onto the wet epoxy. This adds texture and a unique look to the floor.
4. Curing the Epoxy: Patience is Key
Allow to Cure: After application, let the epoxy cure for the recommended time, typically 24-48 hours. Avoid walking on the floor during this period to prevent imperfections.
Apply a Second Coat: For increased durability, consider applying a second coat of epoxy once the first layer has fully cured.
5. Final Inspection and Maintenance
Inspect the Floor: Once the epoxy has cured, inspect the surface for any areas that may need touch-ups or additional coverage.
Maintain the Floor: To keep your epoxy basement floor looking its best, clean it regularly with a soft broom and mop with a mild cleaner as needed.
By carefully following these steps, you can achieve a long-lasting, visually appealing epoxy floor in your basement. Whether you’re aiming to create a sleek, modern space or simply want a more durable surface, applying epoxy is a great way to enhance your basement’s functionality and aesthetic.
Maintenance and Care for Epoxy Basement Floors

Epoxy basement floors are celebrated for their durability and ease of maintenance. To ensure they continue to look their best and perform well over time, following a few essential care and maintenance practices is crucial.
1. Regular Cleaning
Daily Maintenance: Sweep or vacuum your epoxy basement floor daily to remove dust, dirt, and debris. Regular removal of these particles prevents them from scratching or dulling the surface.
Weekly Cleaning: Mop the floor weekly with a mild, pH-neutral cleaner. Avoid harsh chemicals or abrasive cleaners that can damage the epoxy finish. Use a damp mop and avoid excessive water, as standing water can affect the epoxy over time.
2. Spot Cleaning
Address Spills Promptly: Clean up spills and stains immediately to prevent them from penetrating the surface. Use a soft cloth or sponge with a mild cleaner to tackle stains, and rinse the area with clean water.
Stubborn Stains: For tougher stains, you can use a solution of vinegar and water or a dedicated epoxy cleaner. Test any cleaner in an inconspicuous area first to ensure it does not damage the finish.
3. Preventive Measures
Use Mats and Rugs: Place mats or rugs at entry points to catch dirt and moisture before it reaches the epoxy floor. This helps reduce the amount of grime that can be tracked in and potentially cause damage.
Protective Pads: Attach felt or rubber pads to the legs of furniture to prevent scratches and scuffs. These pads help distribute weight more evenly and minimize damage to the epoxy surface.
4. Avoiding Common Issues
Prevent Scratches: While epoxy floors are resistant to scratches, sharp objects or heavy impacts can still cause damage. Be cautious with heavy items and avoid dragging furniture across the floor.
Maintain Adequate Ventilation: Ensure good ventilation in your basement to prevent excessive moisture build-up, which can affect the integrity of the epoxy over time.
5. Periodic Inspection
Check for Damage: Regularly inspect your epoxy floor for signs of wear or damage, such as peeling or cracking. Address any issues promptly to prevent them from worsening.
Reapply Epoxy if Needed: Depending on the level of use and wear, you may need to reapply a topcoat of epoxy to maintain the floor’s appearance and durability. Consult with a professional for advice on reapplication and maintenance schedules.
By following these maintenance and care tips, you can keep your epoxy basement floor in excellent condition for years to come. Proper care ensures that the floor remains a beautiful, functional, and durable part of your basement space.
Epoxy Basement Floor Costs - What You Need to Know

Epoxy basement floors are a popular choice for their durability, aesthetic appeal, and ease of maintenance. However, understanding the costs involved can help you make an informed decision. Here’s a breakdown of what you need to know about epoxy basement floor costs.
1. Cost Factors
Type of Epoxy:
Basic Epoxy: Generally the most affordable, basic epoxy coatings provide a solid, functional finish. Prices usually range from $2 to $5 per square foot.
Metallic Epoxy: This high-end option creates a stunning, reflective surface with a three-dimensional effect. Costs can range from $7 to $12 per square foot due to the added complexity and materials.
Decorative Flake Epoxy: This type adds visual interest and texture. It typically costs between $5 and $8 per square foot, depending on the size and color of the flakes used.
Preparation and Repair:
Proper surface preparation is crucial for a successful epoxy application. Costs for cleaning, etching, and repairing the concrete floor can add $1 to $3 per square foot, depending on the condition of the existing floor.
Installation Complexity:
DIY Installation: Handling the project yourself can save on labor costs, but requires a good understanding of the process and may involve additional expenses for tools and materials. DIY costs typically range from $1 to $3 per square foot, excluding professional-grade equipment.
Professional Installation: Hiring a professional ensures a high-quality finish and proper application. Professional services can range from $4 to $10 per square foot, including labor and materials.
2. Additional Costs
Primer and Topcoat: Some epoxy systems require a primer and/or topcoat for optimal adhesion and durability. These additional layers can add $1 to $2 per square foot.
Additives: Slip-resistant additives or other enhancements can increase the cost. Expect to pay an additional $0.50 to $2 per square foot for these options.
Design Features: Custom designs, such as intricate patterns or multiple colors, can significantly increase costs. Design work might add $2 to $5 per square foot.
3. Long-Term Costs
Maintenance: Epoxy floors are relatively low-maintenance, but periodic cleaning and potential touch-ups can incur minor costs over time. Regular maintenance helps preserve the appearance and longevity of the floor.
Repairs: While epoxy floors are durable, they can still sustain damage from heavy impacts or excessive moisture. Repair costs can vary based on the extent of the damage and whether professional services are required.
4. Budget Considerations
Get Multiple Quotes: To ensure you get the best value, seek quotes from several contractors or suppliers. Compare the costs of different types of epoxy and installation services.
Assess Long-Term Value: While the initial investment might be higher than some flooring options, the durability and low maintenance of epoxy can provide significant long-term value.
By understanding the factors influencing epoxy basement floor costs, you can better plan your budget and make an informed decision. Whether opting for a DIY approach or professional installation, investing in quality epoxy will enhance the functionality and appearance of your basement space.
Common Issues and Solutions

Epoxy basement floors are known for their durability and low maintenance, but they are not immune to issues. Understanding common problems and their solutions can help you maintain the quality and appearance of your epoxy floor. Here’s a guide to addressing common issues:
1. Peeling or Blistering
Issue: Peeling or blistering can occur if the epoxy doesn’t adhere properly to the concrete surface.
Solutions:
Proper Surface Preparation: Ensure the concrete is clean, dry, and properly etched before applying epoxy. Remove any old coatings or residues that could affect adhesion.
Correct Mixing: Follow the manufacturer's instructions for mixing the epoxy resin and hardener. Incorrect mixing ratios can cause adhesion problems.
Allow Adequate Curing Time: Make sure the epoxy cures fully before subjecting it to foot traffic or heavy use. Rushing the process can lead to peeling.
2. Bubbles and Air Pockets
Issue: Air bubbles trapped in the epoxy can create an uneven surface.
Solutions:
Mix Thoroughly: Mix the epoxy slowly and thoroughly to minimize the introduction of air bubbles. Use a mixing drill with a paddle attachment for best results.
Use a Heat Gun: After application, use a heat gun to gently pop bubbles on the surface. Be cautious not to overheat the epoxy.
3. Discoloration or Yellowing
Issue: Epoxy may discolor or yellow over time due to exposure to UV light or chemical reactions.
Solutions:
Use UV-Resistant Epoxy: Choose a UV-resistant epoxy if the basement has exposure to sunlight or other sources of UV light.
Regular Cleaning: Clean the surface regularly to remove any substances that could contribute to discoloration.
Protective Coatings: Applying a clear topcoat with UV protection can help maintain the epoxy’s color and prevent yellowing.
4. Cracking
Issue: Cracks can develop in the epoxy if the underlying concrete shifts or settles.
Solutions:
Repair Concrete First: Address any cracks or issues in the concrete before applying epoxy. Use a concrete patch to fill and repair cracks.
Flexible Epoxy Systems: Consider using a flexible epoxy system designed to accommodate minor shifts and movements in the concrete.
5. Stains and Discolorations
Issue: Stains or discolorations can appear on the epoxy surface due to spills or exposure to certain chemicals.
Solutions:
Immediate Cleaning: Clean up spills promptly to prevent them from penetrating the surface. Use a mild cleaner and avoid harsh chemicals.
Regular Maintenance: Implement a regular cleaning routine to prevent stains from becoming embedded. Use a mop and mild detergent for routine cleaning.
6. Slipperiness
Issue: Epoxy floors can become slippery, especially when wet.
Solutions:
Anti-Slip Additives: Incorporate anti-slip additives into the epoxy to improve traction and reduce the risk of slipping.
Use Mats or Rugs: Place mats or rugs in high-traffic areas to provide additional grip and absorb moisture.
By addressing these common issues proactively, you can ensure your epoxy basement floor remains in excellent condition. Regular maintenance, proper application techniques, and timely repairs will help you preserve the floor’s durability and appearance for years to come.
Epoxy Basement Floor Ideas for Creative Design
Epoxy basement floors offer a versatile foundation for creative design, allowing you to enhance your basement’s aesthetics and functionality. Here are some innovative ideas to inspire your next epoxy floor project:
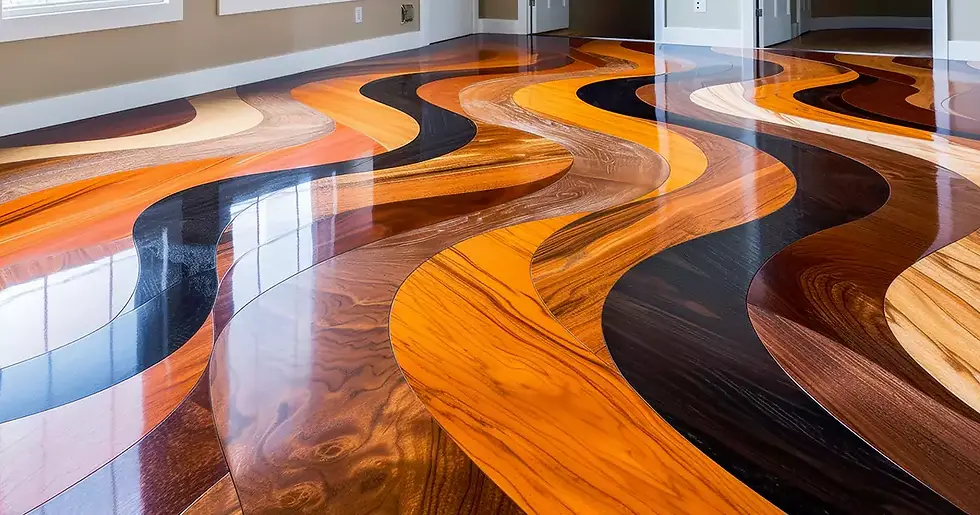
1. Metallic Epoxy Floors
Description: Metallic epoxy floors create a striking, high-gloss finish with a three-dimensional look. The swirling patterns and reflective surface add depth and sophistication to your basement.
Design Tips:
Color Choices: Opt for colors like silver, gold, or copper to achieve a metallic sheen.
Application Technique: Use a professional-grade metallic epoxy kit and apply with a specialized roller or trowel for the best results.
2. Flake Epoxy Floors
Description: Decorative flake epoxy floors incorporate colored flakes or chips into the epoxy coating, providing a textured and vibrant finish. This design is both visually appealing and functional.
Design Tips:
Flake Size and Color: Choose from various flake sizes and colors to create custom patterns or a uniform look.
Blend Options: Mix different colors for a unique, personalized design or a more uniform appearance.
3. Custom Logos and Graphics
Description: Incorporating custom logos or graphics into your epoxy basement floor can add a personal touch or showcase your brand.
Design Tips:
Professional Assistance: Work with a professional installer who can create stencils or use advanced techniques to embed designs into the epoxy.
Durability: Ensure the design is well-protected with a clear topcoat to maintain its appearance over time.
4. 3D Epoxy Floors
Description: Create a dramatic visual effect with 3D epoxy floors, which use detailed graphics and a clear epoxy layer to produce a realistic, three-dimensional appearance.
Design Tips:
Artwork Selection: Choose artwork or designs that enhance the space, such as ocean scenes, abstract patterns, or geometric shapes.
Professional Installation: 3D epoxy floors require expert installation to ensure proper application and alignment.
5. Color-Coded Zones
Description: Use different colors of epoxy to define specific areas or zones within the basement, such as a workout area, playroom, or lounge space.
Design Tips:
Contrasting Colors: Select contrasting colors to clearly delineate different zones.
Seamless Transitions: Use a clear or neutral color epoxy as a base to ensure seamless transitions between different zones.
6. Terrazzo-Style Epoxy
Description: Terrazzo-style epoxy floors mimic the appearance of traditional terrazzo flooring by incorporating large, colorful chips into the epoxy.
Design Tips:
Chip Variation: Experiment with different chip sizes and colors to create a pattern that suits your style.
Consistency: Ensure an even distribution of chips for a uniform look.
7. Glitter Epoxy Floors
Description: Add a touch of sparkle with glitter epoxy floors, which incorporate glitter into the epoxy for a shimmering effect.
Design Tips:
Glitter Type: Choose between fine or coarse glitter depending on the level of sparkle you want.
Application: Mix glitter thoroughly into the epoxy and apply evenly to achieve a consistent glitter effect.
8. Epoxy Floor Patterns
Description: Create unique patterns or designs using epoxy, such as chevrons, stripes, or geometric shapes.
Design Tips:
Stencil Use: Use stencils or masking tape to create precise patterns.
Color Coordination: Coordinate colors to match or complement other elements in the basement.
9. Faux Concrete or Stone
Description: Achieve the look of natural concrete or stone with epoxy flooring that replicates these textures and patterns.
Design Tips:
Texture Application: Use techniques such as stamping or rolling to mimic the appearance of concrete or stone.
Color Selection: Choose colors that closely resemble natural stone or concrete for a realistic look.
By exploring these creative design ideas, you can transform your basement with an epoxy floor that reflects your personal style and enhances the overall look of the space. Whether you prefer a high-gloss metallic finish or a customized graphic design, epoxy offers endless possibilities for unique and functional flooring solutions.
Is Epoxy Right for Your Basement? A Final Word
Epoxy flooring can be an excellent choice for your basement if you value durability, ease of maintenance, and design flexibility. It is particularly well-suited for areas with high traffic or potential exposure to moisture and chemicals. However, consider factors such as surface preparation, installation complexity, and overall cost before making your decision.
By evaluating these aspects, you can determine if epoxy flooring aligns with your needs and preferences. If so, you'll enjoy a resilient, attractive, and functional floor that enhances your basement's overall appeal and usability.
Комментарии